
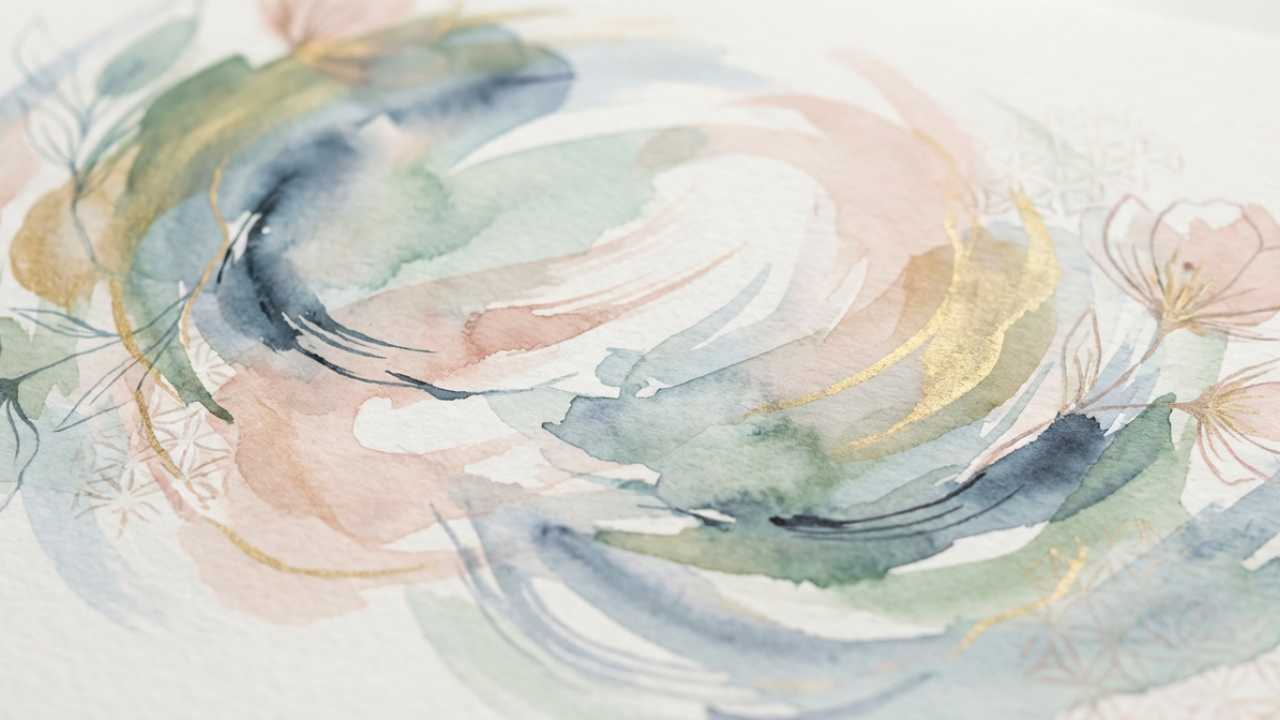
Watercolor Landscape Painting
Watercolor landscape painting combines transparent pigments with water to create beautiful outdoor scenes. This art form lets beginners capture nature’s beauty through simple techniques like wet-on-wet blending and layered washes. The medium’s flowing nature makes it perfect for painting skies, mountains, and water scenes with natural-looking effects.
Getting Started with Watercolor Landscape Painting
Watercolor landscape painting opens up a world of creative possibilities for artists of all skill levels. Unlike other painting mediums, watercolors offer a unique transparency that perfectly captures the soft, natural light found in outdoor scenes.
The beauty of watercolor landscape painting lies in its spontaneous nature. Water and pigment interact in ways that often surprise even experienced artists. This unpredictability creates organic textures that work wonderfully for painting clouds, foliage, and water reflections.
Many beginners choose landscape subjects because nature provides endless inspiration. From simple sunset scenes to complex mountain vistas, watercolor landscapes can be as simple or detailed as your skill level allows. The key is understanding how water and pigment work together to create depth, atmosphere, and mood in your paintings.
Watercolor landscape painting for beginners starts with understanding the three basic washes: flat, graded, and variegated. These fundamental techniques form the backbone of all landscape painting approaches.
Why Choose Watercolor for Landscape Art
Natural Flow and Movement
Watercolor pigments flow naturally across paper, creating soft edges that mimic how we actually see landscapes. The medium excels at capturing atmospheric effects like morning mist or distant mountains fading into the horizon.
This natural flow helps create realistic transitions between sky and land and water and shore. The way colors bleed and blend mirrors the soft edges we see in nature, making watercolor the perfect medium for outdoor scenes.
Quick and Portable
Watercolor supplies are lightweight and portable. A small paint set, brushes, and watercolor paper let you paint outdoors easily. This makes watercolor perfect for plein air painting sessions.
Professional landscape artists often carry compact watercolor sets on hiking trips. The ability to capture a scene quickly while the light is perfect makes watercolor ideal for outdoor painting adventures.
Forgiving Medium for Beginners
Easy watercolor landscape painting techniques are very forgiving. Happy accidents often become beautiful effects. If you make a mistake, you can often blend it into the surrounding area or incorporate it into your design.
The transparency of watercolor means you can layer colors to fix problems or add depth. This flexibility gives beginners confidence to experiment without fear of ruining their work.
Cost-Effective Art Supply
Watercolor painting landscape village scenes or mountain views doesn’t require expensive equipment. Basic supplies can last for many paintings, making this an affordable hobby to start.
A basic watercolor set, a few brushes, and a paper pad cost less than oil painting supplies. You can create hundreds of paintings with one tube of paint, making watercolor an economical choice for new artists.
Understanding Watercolor Properties for Landscapes
Transparency and Luminosity
Watercolor’s transparency allows light to pass through paint layers and reflect off the white paper beneath. This creates the luminous quality that makes watercolor landscapes glow with natural light.
Understanding transparency helps you plan color layers. Light colors should go down first, with darker colors layered on top. This builds depth and maintains the bright, airy quality watercolor is known for.
Water Control Fundamentals
Water control is the most important skill in watercolor landscape painting. Too much water creates uncontrolled bleeding. Too little water makes harsh, streaky marks.
Learn to observe your paper’s dampness level. Shiny wet paper will create maximum color flow. Damp paper gives controlled bleeding. Dry paper produces crisp, defined edges.
Pigment Behavior in Landscapes
Different pigments behave differently when mixed with water. Earth tones like burnt umber and raw sienna are perfect for painting rocks and tree trunks. Blues and purples work well for atmospheric distance effects.
Some colors are staining (like alizarin crimson) and penetrate deep into paper fibers. Others are non-staining (like ultramarine blue) and can be lifted more easily. Understanding these properties helps you plan your painting approach.
Essential Supplies for Watercolor Landscape Painting
Paint Selection for Landscapes
Primary Colors for Mixing:
- Cadmium yellow light (warm yellow)
- Alizarin crimson (cool red)
- Ultramarine blue (warm blue)
- Prussian blue (cool blue)
Earth Tones for Natural Effects:
- Burnt umber (dark brown for tree trunks)
- Raw sienna (golden brown for autumn colors)
- Yellow ochre (muted yellow for sunlit grass)
- Payne’s gray (cool gray for storm clouds)
Convenience Colors:
- Sap green (bright foliage)
- Viridian (cool green for distant trees)
- Cadmium orange (sunset colors)
- Cerulean blue (clear sky effects)
Brush Selection Guide
Large Flat Brushes (1-2 inches): Used for painting large sky areas and initial washes. These brushes hold lots of water and paint, perfect for covering big areas quickly.
Medium Round Brushes (#8-12): The workhorses of watercolor landscape painting. Good for painting medium-sized shapes like trees, rocks, and buildings in landscape scenes.
Small Detail Brushes (#2-4): Perfect for adding final details like small branches, birds, or architectural elements in watercolor landscape drawing.
Specialty Brushes:
- Fan brushes for painting grass textures
- Liner brushes for thin tree branches
- Mop brushes for soft, atmospheric effects
Paper Knowledge for Better Results
Weight Considerations:
- 90 lb paper buckles badly when wet
- 140 lb paper works well for most landscapes
- 300 lb paper stays flat even with heavy water use
Surface Textures:
- Hot-pressed (smooth)—good for detailed work
- Cold-pressed (medium texture)—most popular for landscapes
- Rough—creates interesting texture effects
Paper Brands: Different paper brands behave differently. Arches paper is considered the gold standard but costs more. Canson and Strathmore offer good quality at lower prices for beginners.
Comprehensive Step-by-Step Watercolor Landscape Painting Techniques
Advanced Sky Painting Methods
Clear Sky Technique: Start with a graded wash from deep blue at the top to pale yellow near the horizon. Wet the entire sky area first. Mix ultramarine blue with a tiny bit of alizarin crimson for the top. Gradually add more water as you paint downward.

Cloud Formation Painting: While the sky wash is still damp, use a clean, damp brush to lift out cloud shapes. For darker storm clouds, drop in Payne’s gray while the paper is still moist.

Sunset and Sunrise Effects: Start with yellow at the horizon, blending up through orange to deep purple or blue at the top. Work quickly while the paper stays wet for smooth color transitions.

Mountain and Hill Techniques
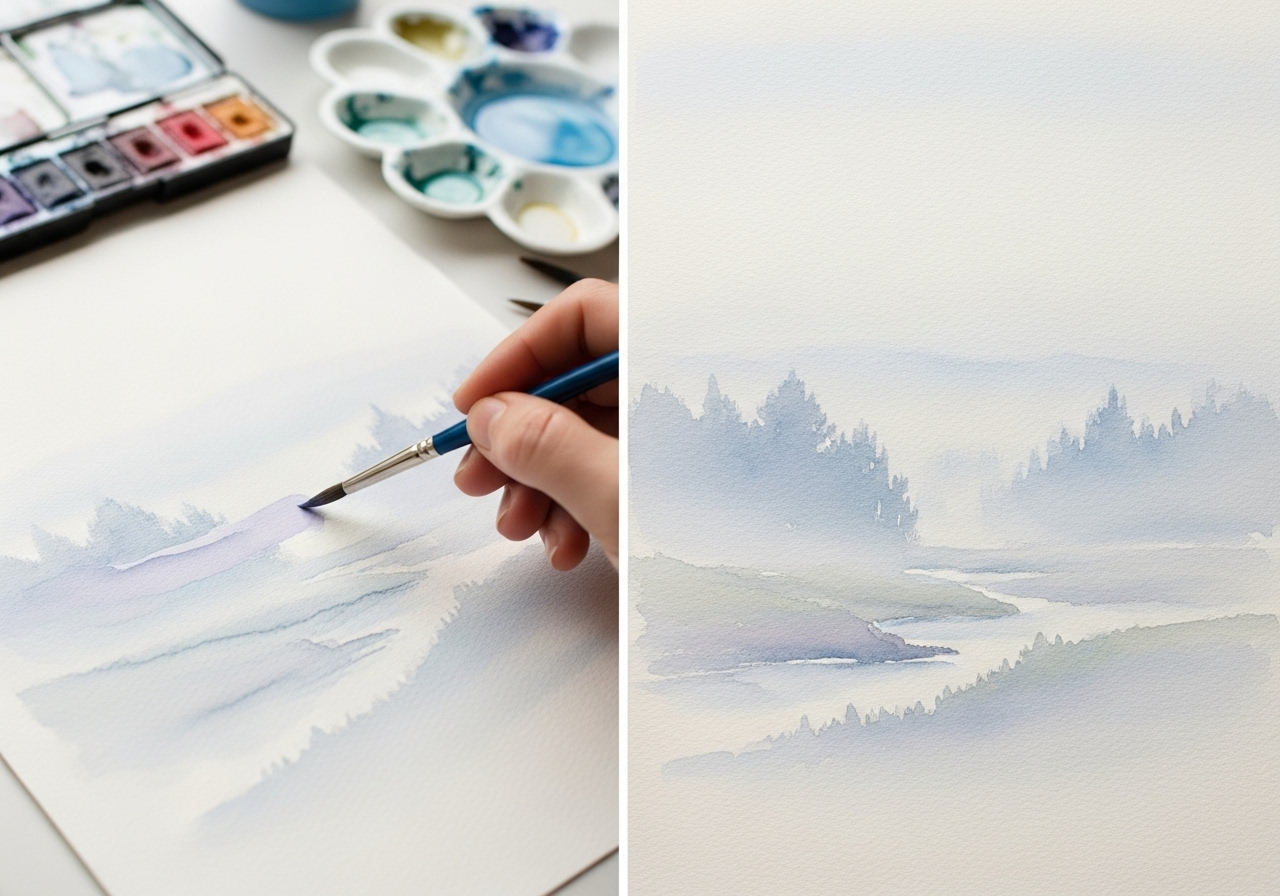
Atmospheric Perspective: Distant mountains appear lighter and cooler than nearby hills. Mix your mountain colors with more blue and use less pigment concentration. This creates the illusion of atmospheric distance.

Layering Mountain Ranges: Paint the farthest mountains first with very pale, cool colors. Add progressively darker and warmer colors for closer mountain ranges. This builds convincing depth in your landscape.

Rock and Cliff Details: Use dry brush techniques for rocky textures. Load your brush with thick paint and drag it lightly across textured paper. The paint catches on the paper’s peaks, creating realistic rock textures.

Watercolor Painting Mastery
Still Water Reflections: Paint water slightly darker than the sky it reflects. Use horizontal brushstrokes to suggest a water surface. Add a few vertical lines to break up perfect reflections and make water look more natural.

Moving Water Effects: For streams and rivers, paint the basic water shape first. While still damp, use a clean brush to lift out light areas where water flows over rocks. Add darker accents to show depth and movement.

Ocean and Wave Techniques: Paint waves with curved brushstrokes that follow the wave shape. Leave white paper for foam and spray. Use masking fluid to preserve small foam details before painting the surrounding water.

Vegetation and Tree Painting
Basic Tree Shapes: Start with simple tree silhouettes. Paint the overall tree shape first, then add details like branches and leaves. Different tree species have characteristic shapes—learn to observe and simplify these forms.

Foliage Textures: Use sponging techniques for realistic leaf textures. Dab a natural sponge into green paint and press it onto dry paper. Layer different shades of green for convincing foliage effects.

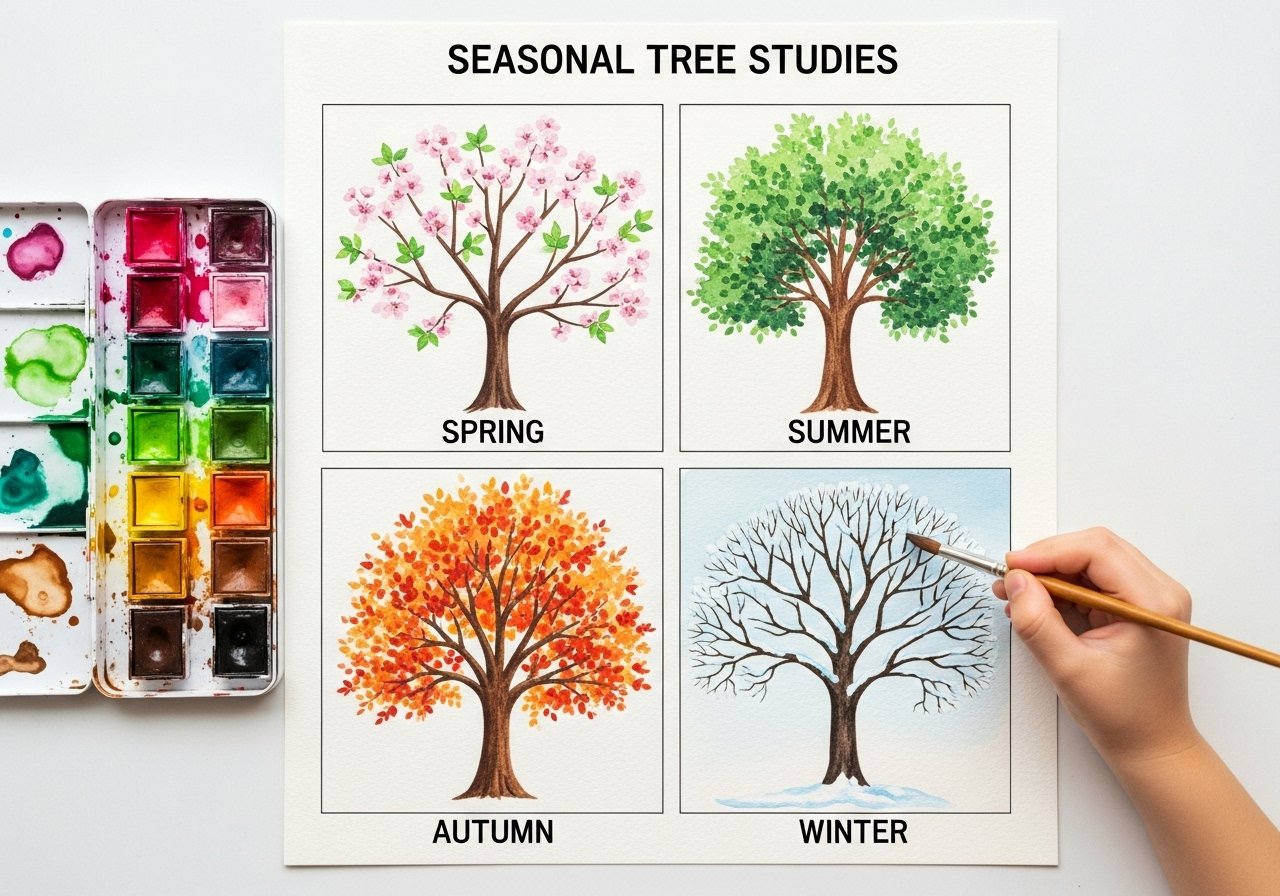
Seasonal Tree Effects:
- Spring: Light greens with some bare branches showing
- Summer: Deep, rich greens in multiple layers
- Autumn: Warm oranges, reds, and yellows mixed with some greens
- Winter: Bare branch structures with snow highlights

Creative Watercolor Landscape Painting Ideas
Urban Landscape Scenes
Watercolor Painting Landscape Village: Village scenes combine architecture with natural elements. Start with basic building shapes, then add rooflines, windows, and doors. Include surrounding trees and gardens to soften hard architectural edges.
Paint village scenes with warm, inviting colors. Use burnt sienna and yellow ochre for building walls. Add cool blue shadows to create depth and dimension.

Seasonal Inspiration Gallery
Spring Landscapes:
- Cherry blossom trees with soft pink flowers
- Fresh green meadows with wildflower details
- Misty morning scenes with dewdrops
- Garden scenes with emerging bulb flowers

Summer Scenes:
- Bright beach landscapes with clear water
- Lush forest interiors with dappled sunlight
- Field scenes with tall grass and wildflowers
- Lake scenes with reflected summer clouds

Autumn Colors:
- Forest scenes with brilliant fall foliage
- Harvest scenes with golden wheat fields
- Mountain landscapes with changing aspen trees
- Vineyard scenes with autumn grape colors

Winter Paintings:
- Snow-covered pine forest scenes
- Frozen lake landscapes with ice effects
- Cozy cabin scenes with chimney smoke
- Winter sunset scenes with bare tree silhouettes

Weather and Atmospheric Effects
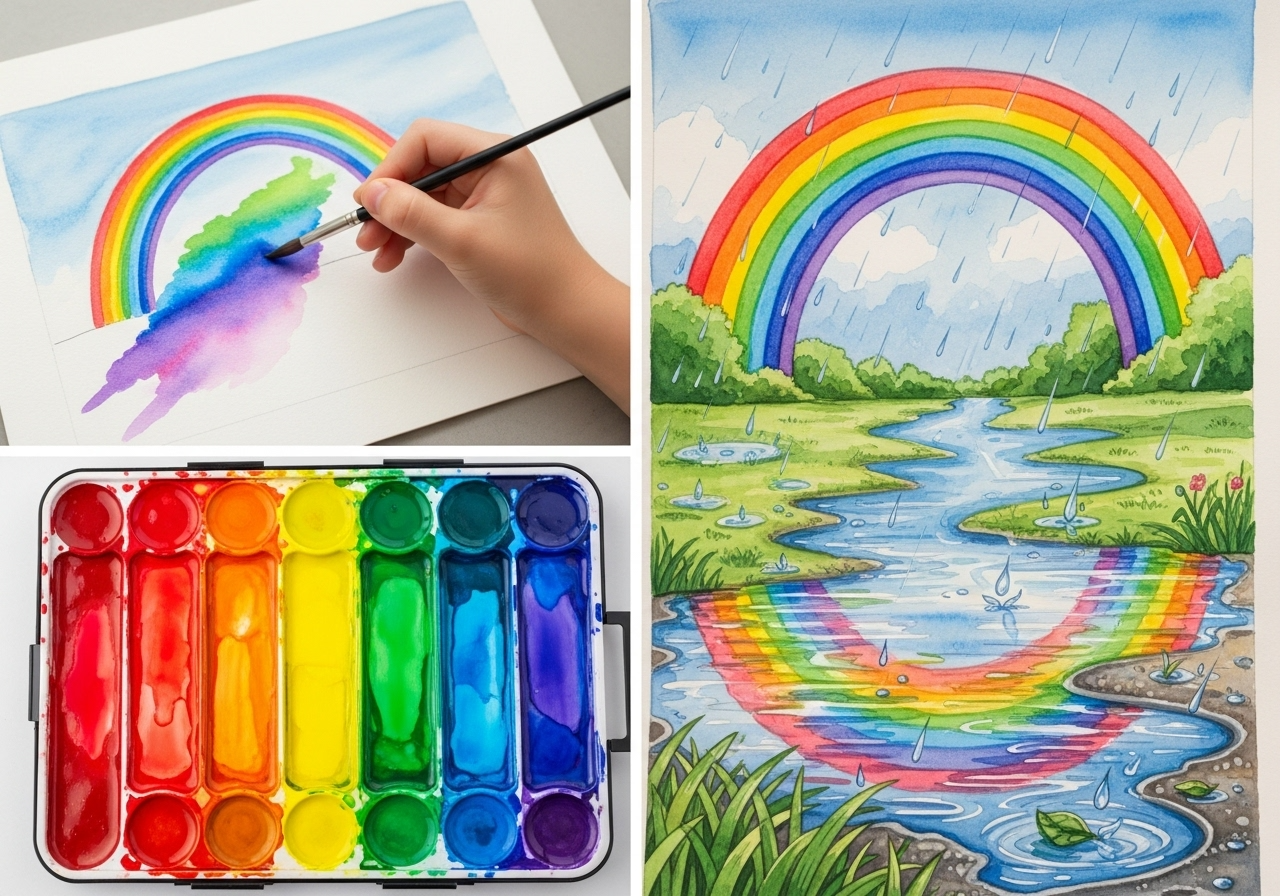
Rainy Day Landscapes: Use vertical brushstrokes to suggest falling rain. Paint wet streets with strong reflections. Include umbrellas and people for scale and interest.

Foggy Morning Scenes: Use very pale, cool colors for fog effects. Layer multiple light washes to build mysterious, atmospheric moods. Leave soft edges on all shapes emerging from fog.
Stormy Weather Painting: Use dramatic color contrasts and bold brushstrokes. Dark storm clouds with bright sunlight breaking through create powerful emotional impact in landscape paintings.

Advanced Techniques for Professional Results
Color Temperature Control
Understanding warm and cool colors is crucial for convincing landscapes. Warm colors (reds, oranges, and yellows) appear to come forward. Cool colors (blues, purples, and cool greens) recede into the distance.
Use this knowledge to create depth. Paint foreground elements with warmer colors and background elements with cooler colors. This simple principle dramatically improves landscape depth.
Value Planning for Strong Compositions
Before starting any watercolor landscape painting step-by-step, plan your values. Squint at your reference photo to see the main light and dark patterns.
Create a simple three-value plan: light, medium, and dark. Most successful landscapes use all three values, with one value dominating the composition.
Negative Space Painting
Sometimes it’s easier to paint around shapes rather than painting the shapes themselves. This technique works well for painting tree branches against the sky or light-colored buildings against dark backgrounds.
Paint the background color first, carefully painting around the lighter shape you want to preserve. This creates crisp, clean edges that are difficult to achieve with direct painting.
Masking and Resist Techniques
Masking Fluid Applications: Use masking fluid to preserve white areas like birch bark, light reflections on water, or snow on tree branches. Apply with an old brush or rubber cement pickup tool.
Natural Resist Methods: Candle wax or crayon can create interesting resist effects. Rub lightly over textured paper, then paint over with watercolor. The wax resists the paint, creating broken texture effects perfect for rock surfaces or tree bark.
Lifting and Scraping Techniques
Wet Lifting: While paint is still wet, use a clean, damp brush to lift out lighter areas. This technique works well for creating cloud shapes or light areas in foliage.
Dry Scraping: Use a craft knife blade to scrape dry paint and expose white paper beneath. This creates sharp highlights perfect for light reflecting off water or snow on branches.
Common Mistakes and How to Fix Them
Overworking Problems
The Issue: Beginning artists often keep working on areas that are already finished. This creates muddy colors and lifeless surfaces.
The Solution: Learn to recognize when an area is finished. Watercolor often looks best with minimal brushstrokes. Practice painting simple shapes with confidence and resist the urge to keep “fixing” them.
Water Control Issues
Too Much Water: Flooding paper with water causes uncontrolled bleeding and weak colors. Paint has no texture or definition.
Too Little Water: Using too little water creates harsh, streaky brush marks and prevents smooth color blending.
Finding Balance: Practice controlling water amounts on scrap paper before painting. Learn to recognize the right dampness level for different effects.
Color Mixing Mistakes
Muddy Color Problems: Mixing too many colors together, especially complementary colors, creates muddy grays and browns.
Solution: Limit color mixing to two or three colors maximum. Learn which colors mix cleanly together and which combinations to avoid.
Composition Weaknesses
Centering Everything: Beginning artists often put the horizon line, main tree, or focal point right in the center of the paper.
Rule of Thirds: Place important elements along imaginary lines that divide your paper into thirds. This creates more dynamic, interesting compositions.
Watercolor Landscape Painting for Kids
Age-Appropriate Techniques
Ages 5-8: Focus on basic shapes and primary colors. Simple sun, clouds, trees, and houses work well. Don’t worry about realistic proportions or details.
Ages 9-12: Introduce basic landscape elements like foreground, middle ground, and background. Teach simple sky washes and tree shapes.
Teen Artists: Challenge older kids with more complex techniques like reflections, shadows, and atmospheric perspective.
Safe and Fun Project Ideas
Rainbow Landscapes: Paint scenes right after rain with bright rainbow colors.
Seasonal Tree Studies: Paint the same tree in different seasons.
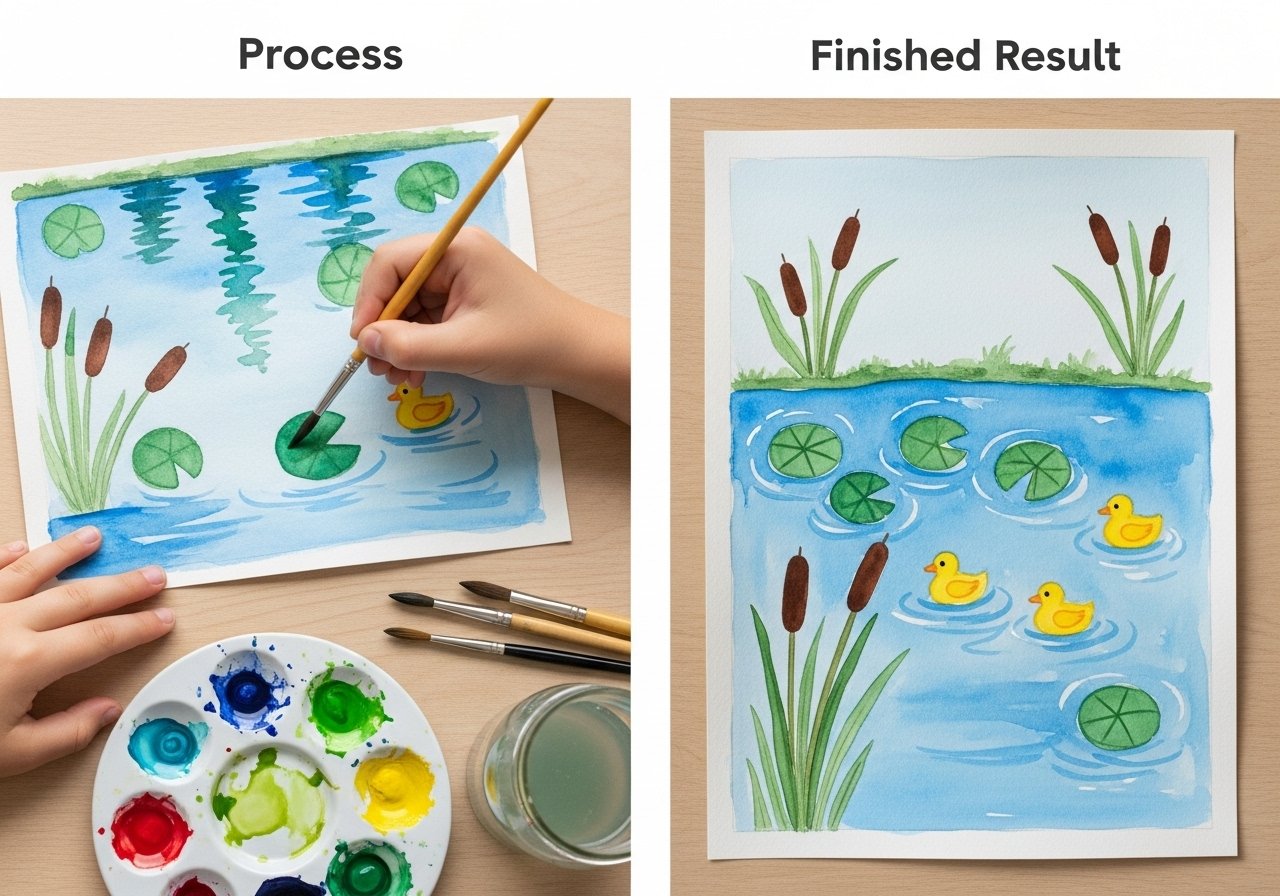
Simple Pond Scenes: Include ducks, cattails, and lily pads
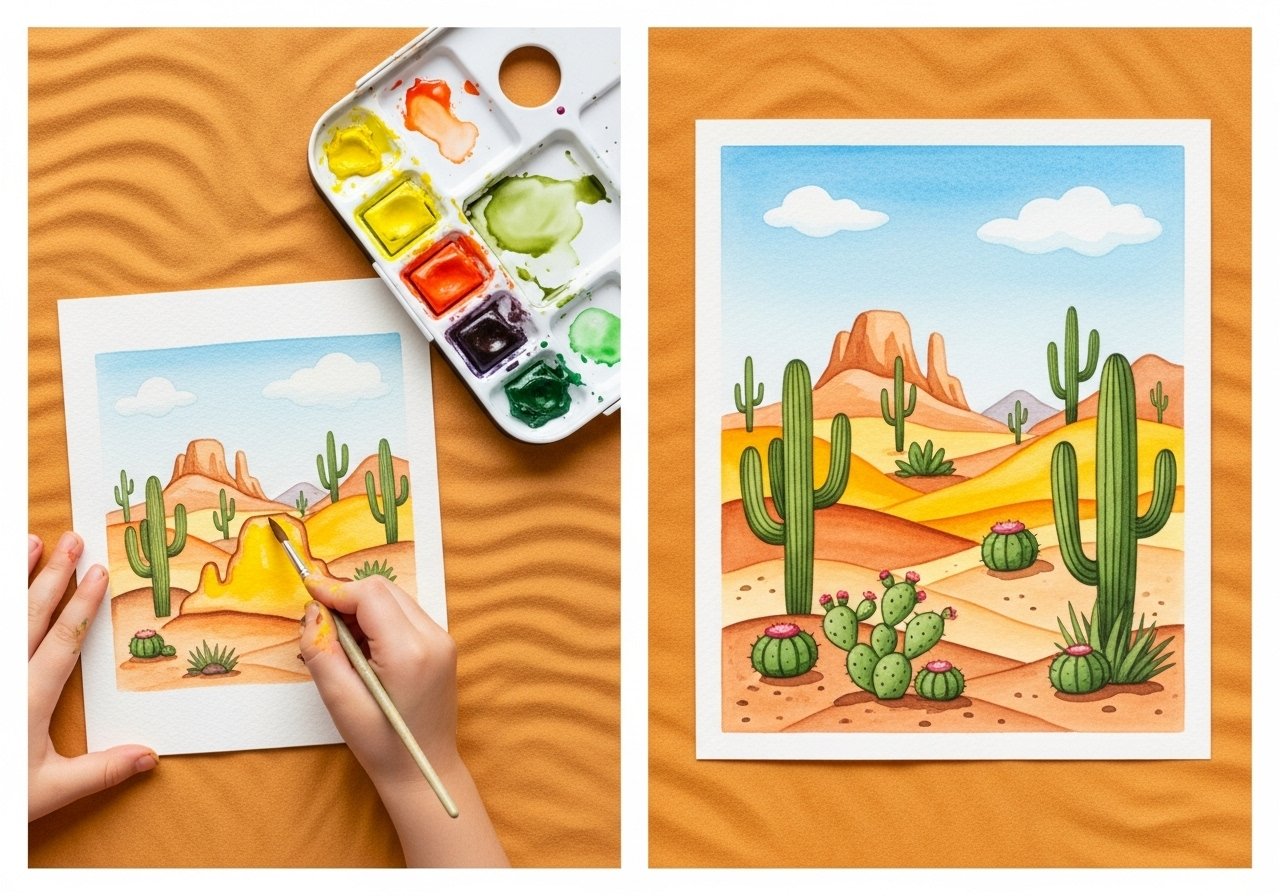
Desert Landscapes: Cacti and simple rock formations
Snow Scenes: Use salt techniques for snowflake effects

Teaching Tips for Kids
Keep sessions short (30-45 minutes maximum). Provide plenty of water and paper towels. Focus on fun and experimentation rather than perfect results. Celebrate unique interpretations and creative solutions.
Learning from Master Artists
Famous Watercolor Paintings of Landscapes
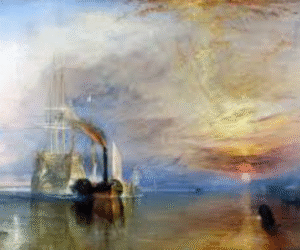
J.M.W. Turner (1775-1851): Turner revolutionized watercolor landscape painting with his dramatic use of light and atmosphere. Study his late works to understand how minimal detail can create maximum impact.
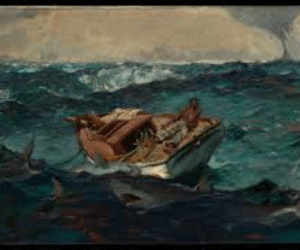
Winslow Homer (1836-1910): Homer’s seascapes and rural scenes demonstrate confident brushwork and strong value patterns. His ability to capture water and weather effects remains unmatched.
John Singer Sargent (1856-1925): Though famous for portraits, Sargent’s landscape watercolors show incredible technical skill and loose, confident handling of the medium.
Contemporary Landscape Masters
Modern watercolor artists continue pushing the medium’s boundaries. Study contemporary work to see how traditional techniques apply to modern subjects and compositions.
Building Your Reference Library
Collect landscape photos for painting reference. Take your own photos when hiking or traveling. Build a collection organized by subjects: skies, trees, water, rocks, and buildings.
Study how light changes throughout the day. The same landscape looks completely different in morning light versus afternoon shadows or golden hour glow.
Frequently Asked Questions
What paper is best for watercolor landscape painting?
Use watercolor paper that’s at least 140 lb weight to prevent buckling. Cold-pressed paper has a slight texture that’s perfect for landscape textures. Hot-pressed paper is smoother and works well for detailed work. Rough paper creates interesting texture effects but can be challenging for beginners.
How do I paint realistic clouds in watercolor?
Start with clean, wet paper. Drop in diluted blue paint, leaving white paper for cloud shapes. While still damp, add gray shadows to cloud bottoms using Payne’s gray or a blue-purple mixture. Work quickly before the paint dries completely. Use a clean, damp brush to soften cloud edges.
Can I use regular brushes for watercolor painting?
Watercolor brushes are specifically designed to hold more water and maintain better points than regular brushes. Natural hair brushes like sable work best but cost more. Synthetic watercolor brushes are affordable and give good results. Regular craft brushes don’t hold enough water for smooth washes.
How long does watercolor landscape painting take to learn?
Basic watercolor landscape painting techniques can be learned in a few weeks of regular practice. Understanding color mixing and water control takes several months. However, mastering the medium takes years of consistent work and experimentation. Start with simple subjects and gradually tackle more complex scenes.
What’s the difference between student and professional watercolor paints?
Professional paints contain more pigment and better lightfastness ratings. They mix cleaner and produce more vibrant colors. Student grades work fine for beginners but may fade over time and contain more filler. Start with student-grade and upgrade to professional paints as your skills improve.
How do I fix mistakes in watercolor paintings?
Small mistakes can often be lifted with a clean, damp brush while paint is still wet. For dry mistakes, try gentle scraping with a craft knife or use opaque white gouache for highlights. Sometimes the best approach is to incorporate the “mistake” into your painting design. Many beautiful effects started as happy accidents.
Should I sketch before painting watercolor landscapes?
Light pencil sketches help plan your composition, especially for complex scenes. Use a 2H pencil and draw very lightly. Heavy pencil marks can show through transparent watercolor. Some artists prefer to paint directly without sketching, which creates looser, more spontaneous results.
How do I create depth in watercolor landscapes?
Use atmospheric perspective principles. Paint distant elements lighter and cooler. Foreground elements should be darker and warmer. Overlap shapes to show spatial relationships. Use size differences—smaller elements appear farther away. Control detail levels—distant areas have less detail than foreground areas.
Planning Your Watercolor Landscape Journey
Setting Realistic Goals
Start with simple goals like completing one small landscape study per week. Focus on learning one new technique each month. Don’t compare your beginner work to professional artists with decades of experience.
Building a Practice Routine
Daily Sketching (15-20 minutes): Quick landscape sketches build observation skills and hand-eye coordination. Use a small sketchbook and basic supplies.
Weekly Painting Sessions (2-3 hours): Dedicate longer sessions to complete paintings. Focus on applying new techniques and solving painting problems.
Monthly Challenges: Set monthly themes like “winter scenes” or “water reflections” to focus your learning and build a cohesive body of work.
Joining Art Communities
Find local watercolor groups or online communities. Sharing work and getting feedback accelerates learning. Many cities have plein air painting groups that meet regularly for outdoor painting sessions.
Conclusion
Watercolor landscape painting offers endless opportunities for creative expression and personal growth. The medium’s unique properties make it perfect for capturing nature’s beauty and atmosphere. Start with simple scenes and basic techniques, then gradually build your skills through regular practice and experimentation.
Remember that every painting teaches you something new about watercolor’s possibilities. Embrace mistakes as learning opportunities, and don’t be afraid to try new approaches. The journey of mastering watercolor landscapes is just as rewarding as the destination.
Ready to start your watercolor landscape adventure? Grab some basic supplies today, find a simple outdoor scene, and create your first masterpiece—you’ll discover the joy and satisfaction of capturing nature’s beauty with brush and pigment! Once you’re confident with your work, you can even sell paintings online to share your art with a wider audience.


Cow Head with Lord Ganesh
Original price was: ₹1,500.00.₹1,000.00Current price is: ₹1,000.00.

Antique Meenakari Bangles
Original price was: ₹1,000.00.₹899.00Current price is: ₹899.00.